
If you are using an older version of the license server, upgrade the license server to use the new concurrent licensing feature.
Follow these steps:
\ CA ERwin DM License Administrator\licenses\erwinmod
The license server is created.
The license server is started.
The license server is successfully upgraded.
Your organization plans to use CA ERwin DM with the concurrent licensing model. In this model, licenses are stored in a server (License Server). When you set up licenses on the License Server, you create a web service to communicate with the CA ERwin DM instances that users open.
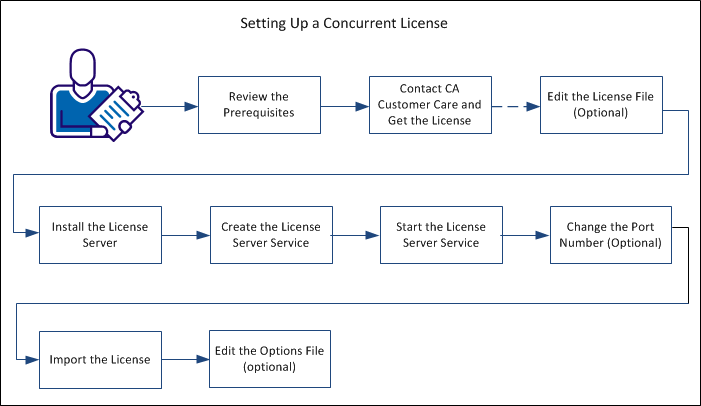
The following diagram illustrates how to set up concurrent licenses:

Perform the following tasks to set up a concurrent license:
To use the concurrent licensing model, install the License Server.
Review the following prerequisites:
Contact CA Customer Care by telephone or the web licensing form with the following items to receive your license files:
After you receive license files, copy them to a folder on the License Server.
Note: To get the MAC address, log on to CA ERwin License Administrator and click the System Information tab. You can also open the Windows command prompt on the License Server and type IPCONFIG /ALL.
If you change the License Server name, edit the license file and include the new name.
Note: CA ERwin Data Modeler opens only after you include the new name in the license file.
Follow these steps:
Typically, the name of the license file is in the (license number) (Edition name) (“server” MAC address).lic format. For example, 111111-2222 Workgroup (server xxxxxxxxxxx).lic.
Note: The SERVER line displays the computer name with a MAC address or any other node-locking identifier that you use. If you use only the computer name as the identifier, you cannot edit the file; contact CA Customer Care to get a new license.
The License Server stores the concurrent license and helps you use CA ERwin DM.
Follow these steps:
The Install License Server wizard opens.
The program files are copied and the License Server is installed.
You must create the License Server service after installing the License Server. This service enables the License Server to process requests to check in or check-out licenses.
To create the License Server service, click Start, All Programs, CA, ERwin, ERwin License Administrator, Create License Server.
Start the License Server service, before you use the License Server. You can start or stop the License Server service using the Windows Start menu.
Click Start, All Programs, CA, ERwin, ERwin License Administrator, Start License Server. The services of the License Server service starts.
The default port number that is used for the License Server is 27000. You can change it if required.
Follow these steps:
The CA ERwin License Administrator window opens.
The Sign In dialog appears.
The Administration tab appears. You are prompted to change the password when you log in for the first time.
You can enter any number that is valid for that computer.
The services of the License Server service stops.
The services of the License Server service starts.
After you have installed the License Server, import the license into it. Importing the license lets users use CA ERwin Data Modeler.
Follow these steps:
The CA ERwin License Administrator window opens.
The Sign In dialog appears.
The Administration tab appears. You are prompted to change the password when you log in for the first time.
Concurrent is set as the default view for the CA ERwin License Administrator Dashboard.
The license is imported and any errors appear in the Alerts section.
The list of imported licenses appears.
Your concurrent license is ready for use.
After you import licenses to a License Server, many times you have to remove a specific license. Use this procedure to remove a license that is imported to the License Server.
Follow these steps:
The deleted license does not appear.
|
Copyright © 2015 CA Technologies.
All rights reserved.
|
|