Select the Right Model
The right model can be a local or a Mart model, or it can be a model that is reverse-engineered from a database or a script. However, as this section describes how to compare a model with a database, it describes reverse-engineering a model from a database for the right model.
To generate the right model, you reverse engineer a database. When you save the database schema, you can use this schema to generate the right model. The reverse engineered model displays in the right pane of the Resolve Difference dialog. Help ensure that you have read and write permissions on all the objects that you want to reverse engineer from the database.
Note: In the following procedure, SQL Server 2008 is selected as the database.
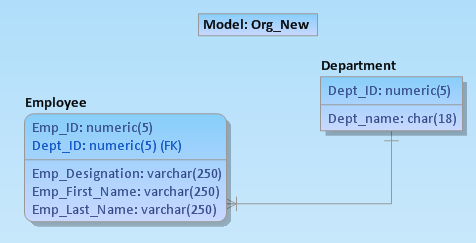
For example, consider Org_New.erwin for the right model. Reverse engineer the Org_New database from SQL Server 2008 to get the model as shown in the following diagram:
Follow these steps:
- In the Right Model Selection pane of the Complete Compare wizard, select Database/Script, select Allow Demand Loading, and click Load.
The New Model dialog opens.
The Allow Demand Loading option loads only the names of tables. It then checks the table names that are matching in the Left Model and populates other properties such as columns and relationships. This helps the model to load faster initially. When the tables or properties that are not matching are imported to the Left model, this process accesses the database again and retrieves the rest of the properties.
- Select the Type as Logical/Physical, Target Server as SQL Server 2008, Template, and click Next.
The Reverse Engineer � Set Options dialog opens. You can also select Database when comparing against a script or a database.
- Work with the following options:
- Reverse Engineer From
Specifies whether you want to reverse engineer from a database or a script. If you choose the script, click Browse to select the file.
Note: To reverse engineer from a script, select a file that is saved either in ANSI or ASCII format.
- Items to Reverse Engineer
Displays the default option set, which includes all the objects and properties for the selected target database. You can change the default option set and save it for future use. The option set can be saved as a model or as an XML file. If you save the option set as a model, the options are applicable only to that model. If you save the option set as an XML file, you can use it with other models as well.
Reverse Engineer
Specifies whether you want to reverse engineer system objects and user tables, or only user tables. If you select the System Objects check box the system tables, views and stored procedures related to system tables are reverse engineered.
- Table/Views Owned By
Reverse engineers tables and views by ownership. You must have read and write privileges on all the tables that you want to reverse engineer, regardless of whether you are the owner of the table. Select one of the following ownership options:
- All
Reverse engineers all tables and views in the database for which you have the necessary permissions, regardless of the owner.
- Current User
Reverse engineers only those tables and views that are owned by the current user. The current user details are entered in the <Database> Connection dialog.
- Owners (comma separated)
Reverse engineers the tables and views that are owned by the users that are specified here. Enter the user names in capital letters.
- Infer
Specifies whether you want to infer primary keys or relationships, or both, during reverse engineering. Work with the following options:
- Primary Keys
Infers primary key columns for the tables that are based on defined indexes.
- Relations
Infers the relationships between tables that are based on either primary key column names or defined indexes. Select this option and then specify whether to use primary key column names or defined indexes:
Indexes
Infers the relationships from the table indexes. Relationships are inferred from table indexes only if the primary key columns of the parent table are part of the index in the child table.
Names
Infers the relationships from the primary key column names. Relationships are inferred from columns names only if all of the primary key columns of the parent are in the child table.
Note: If the target database or script supports primary and foreign key declarations, you do not need to use the Primary Keys, Relations, Indexes, or Names options.
- Case Conversion of Physical Names
Specifies how the case conversion of physical names is handled during reverse engineering. Work with the following options:
- None
Preserves the case exactly as it appears in the script file or database.
- lower
Converts the names to lower case.
- UPPER
Converts the names to upper case.
- Force
Overrides the physical name property for all objects in logical/physical models automatically during reverse engineering.
If this option is not enabled, all logical and physical names are set to the same value after the process completes. If this option is enabled, the logical/physical link is broken between the logical and physical name.
- Case Conversion of Logical Names
Specifies how the case conversion of logical names is handled during reverse engineering. Work with the following options:
- None
Preserves the case exactly as it appears in the script file or database.
- lower
Converts the names to lower case.
- UPPER
Converts the names to upper case.
- Mixed
Preserves mixed-case logical names.
- Include Generated Triggers
Specifies whether erwin-generated triggers are loaded during the reverse engineer process. This option is linked to the Automatically Create RI Triggers setting in the Model Editor, RI Defaults tab. When you choose to create RI triggers automatically, the triggers are treated as model objects. These objects can be forward-engineered into a model, database, or script file. You can include or exclude automatically generated triggers when you reverse engineer.
- Click Next.
One of the following actions occur based on the selection for the Reverse Engineer From option:
- When you select Database, the SQL Server Connection dialog opens.
- When you select Script File, you do not have to connect to the database. The script is reverse engineered and the model opens. Continue to Step 8.
- Enter your database connection credentials and click Connect.
The reverse engineering process runs, and your database appears as the Right Model in the Complete Compare wizard.
- Click Next to save the right model selection and open the Type Selection pane.
The right model is selected.

|
Copyright © 2018 erwin, Inc.
All rights reserved.
|
|