The Project Explorer provides an end-to-end solution to create and control a project, add objects to it, manage and modify these objects, and generate detailed project reports.
To understand the feature further, consider two separate use cases of projects. Note that these use cases need not be mutually exclusive and may often coincide in real life usage.
Use Case 1: Create Projects Using Existing Mart Models
In this example, assume that you have one logical model, SourceModel1, stored in your mart. You aim to derive a set of logical and physical models from it, arranged in a hierarchy of source and target models, and manage them together in erwin DM.
Normally, all derived models are saved separately from their source models, and when you need to work on them, you’ll open them individually. erwin DM displays the opened models on the window. However, erwin DM cannot display the multi-level hierarchy of the source and target models. Additionally, managing large numbers of models on DM screen is hard and time-consuming.
Using projects, you can overcome these challenges. The Project Explorer pane arranges all models in a project in a comprehensible tree structure, where target models are arranged under their respective source models. There are multiple levels of source-target branches to help you understand the hierarchy of these models. Also, using the tree structure in the Project Explorer pane, you can identify and manage the required models.
To start, create a project in erwin DM Project Explorer.
Creating Projects
To create a project, follow these steps:
- In the Project Explorer. click New Project
 .
. - Enter a name and location for the project.
- Select Create directory for project, if you want to create a new directory in the selected project location.
- Click OK.
The Project window appears.
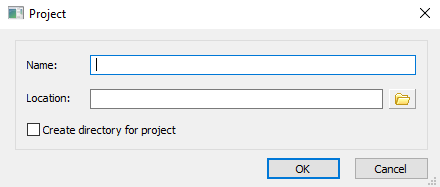
The new project is created.
When you create a project, it automatically opens in the Project Explorer pane.
![]()
Initially, the explorer pane is blank because the project does not contain any objects in it.
Before populating the project with models, you must create a folder to contain them.
You can use more folders to organize your models. This is especially useful if your project contains a significant number of models.
Start by creating a folder to contain the model, SourceModel1 (Logical).
Creating Folders
You can add any number of folders and subfolders in a project, but you cannot create more than one level of subfolders in a folder.
To create a new folder, follow these steps:
- In the Project Explorer, right-click the project name.
- Click New Folder.
- Enter a name for the folder, and press Enter.
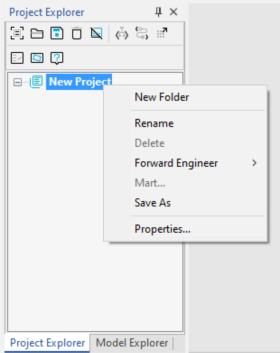
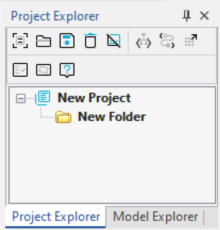
The new folder is added to the project. You can see the new folder under the project in the Project Explorer pane.
Now, you can import the model, SourceModel1, into the folder.
Importing Models from Mart
To import a model from mart, you must first connect to erwin Mart.
Once you are connected, to import the model, follow these steps:
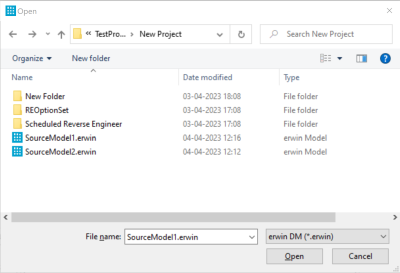
- Right-click the folder that you created.
- Click Add > Open Model from Mart.
- Select the model file.
- Click Open.
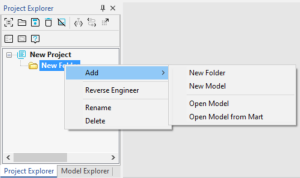
A mart catalogs window appears.
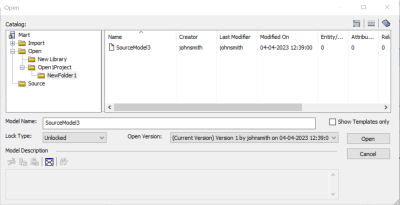
The model is imported to the project. You can find SourceModel in the folder that you created.
Once you have your source model imported into your project, you can derive more logical and physical models from it.
Deriving Target Models
You can derive any model type from an existing model. Some of the more common derive scenarios are:
- Multiple physical models from a logical model. You can use a single conceptual logical model to derive a physical model for different target servers.
- A generic physical model from a logical model. A generic physical model is a model in which you specify DBMS-independent design decisions, and indicate ODBC/generic as the target server.
- A physical model from a logical model. Your new physical model can be customized for a target database and version, and to enforce naming standards.
- A logical model from a logical model. For example, you can derive a new logical model based on a subject area from the source model.
The model that you open before you use the wizard is known as the source model. The source model contains all model objects that you can include in a derived, or target model.
For more information, refer to the Design Layers and Model Derivation topic in the Online Help.
Start by deriving a physical model, TargetModel1, and a logical model, TargetModel2, from the source mart model.
Deriving Physical Models
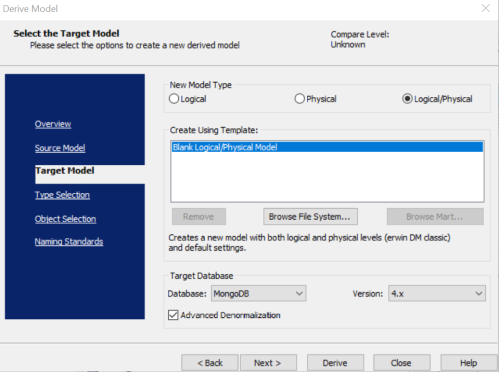
To derive a physical model from SourceModel1, follow these steps:
- Right-click SourceModel1.
- Click DL-Derive.
- On the Target Model tab, under New Model Type, select the model type Physical or Logical/Physical.
- Select the required database and database version.
- Enable Advanced Denormalization, if required.
- Enter appropriate values on the other tabs.
- Click Derive.
- If you have enabled Advanced Denormalization, the Denormalization wizard appears. You can select the objects such as tables and columns for denormalization and click OK.
The Derive Model window appears.
Once you have completed the denormalization process, the new model is added to the project.
You can find the derived model under SourceModel1. By default, erwin DM provides a name for the derived model. You can rename the model to TargetModel1 using the Rename option in Project Explorer.
Deriving Logical Models
To derive a logical model from SourceModel1, follow these steps:
- Right-click SourceModel1.
- Click DL-Derive.
- On the Target Model tab, under New Model Type, select the model type Logical or Logical/Physical.
- Enter appropriate values on the other tabs.
- Click Derive.
The Derive Model window appears.
The new derived model is added to the project.
You can find the derived model under SourceModel1. By default, erwin DM provides a name for the derived model. You can rename the model to TargetModel2 using the Rename option in Project Explorer.
In addition to importing and deriving models, you can also reverse engineer database scripts to add models to projects.
Reverse Engineering Models
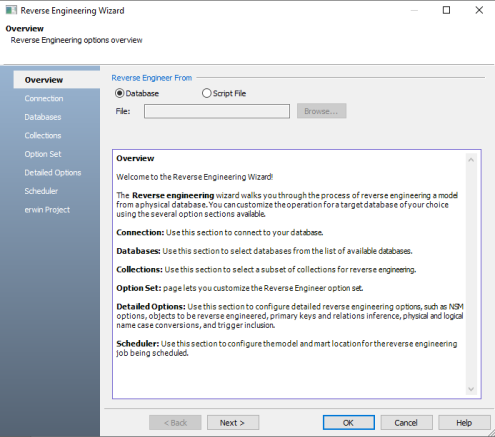
To reverse engineer a model from a database script, follow these steps:
- Right-click the folder in which you want to add the reverse engineered model.
- Click Reverse Engineer.
- Select the type of the model. Available options are Physical, Logical/Physical, and Match Template.
- Select the Target Server database and version.
- Click Next.
- On the Overview tab, browse and select the script file from your storage.
- Enter appropriate values in the fields for the other tabs.
- On the erwin Project tab, select erwin Project to specify the model belongs to a project.
- Enter a name for the model.
- Click OK.
The New Model window appears.
The Reverse Engineering Wizard appears.
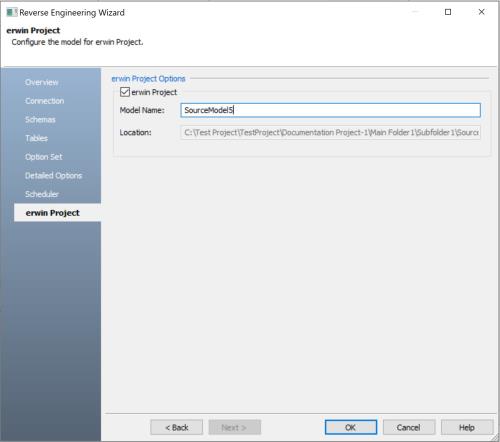
The model is added to the project. You can find the reverse engineered model in the folder you selected.
Now that you have the project and the models ready, you can start working on the models as required.
At any point of time, you can perform the following actions on the project, using the Project Explorer:
- Rename an object
- Delete an object
- Save the project
- Forward engineer models in the project
- Generate project report
To read more about managing projects, refer to the Managing Projects section.
Use Case 2: Create Projects Using New and Local Models
In this example, assume that you have two models from a business application stored in your local system; SourceModel1, a logical model, and SourceModel2, a physical model. To work on the application, you need to open them separately from their respective locations. To collaborate with your team, you need to upload them to Mart. You also must save each model every time you finish working.
However, using projects, you can reduce the effort required to manage these models separately. You can also organize these models at a single location and add more models and objects to the project as required. Apart from this, you can simply save the project to your mart.
To start, create a project in erwin DM Project Explorer.
Creating Projects
To create a project, follow these steps:
- In the Project Explorer. click New Project.
- Enter a name and location for the project.
- Select Create directory for project, if you want to create a new directory in the selected project location.
- Click OK.
The Project window appears.
The new project is created.
When you create a project, it automatically opens in the Project Explorer pane.
![]()
Initially, the explorer pane is blank because the project does not contain any objects in it.
Before populating the project with models, you must create a folder to contain them.
You can use more folders to organize your models. This is especially useful if your project contains a significant number of models.
Start by creating a folder to contain the models, SourceModel1 (Physical) and SourceModel2 (Logical).
Creating Folders
You can add any number of folders and subfolders in a project, but you cannot create more than one level of subfolders in a folder.
To create a new folder, follow these steps:
- In the Project Explorer, right-click the project name.
- Click New Folder.
- Enter a name for the folder, and press Enter.
The new folder is added to the project. You can see the new folder under the project in the Project Explorer pane.
Now, you can import the two models (SourceModel1 and SourceModel2) into the folder.
Importing Models
You can import models from your local storage.
In this example, SourceModel1 and SourceModel2 are in a local folder.
To import models from local folders, follow these steps:
- Right-click the folder that you created.
- Click Add > Open Model.
- Select the model files, SourceModel1.erwin and SourceModel2.erwin.
- Click Open.
A file explorer window appears.
The two models are imported to the project. You can find SourceModel1 and SourceModel2 in the folder that you created.
In addition to importing existing models, you can also create new models in the project.
For this example, create a new model in the folder that you created.
Creating Models
To create a new model, follow these steps:
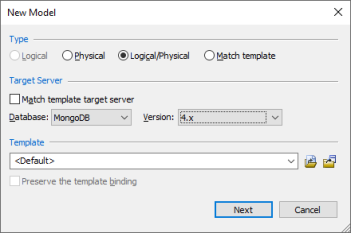
- Right-click the folder that you created.
- Click Add > New Model.
- Enter the model’s name.
- Select the model type. You can create a Logical model, a Physical model, or a Logical/Physical model.
- Select the database and database version for the model. This is available only if you select Physical or Logical/Physical model types.
- Click OK.
The Source Model window appears.
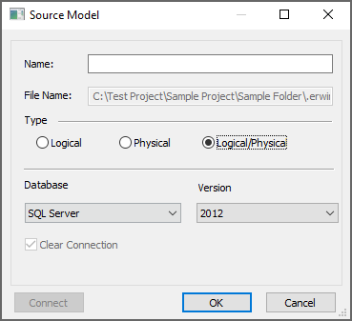
The model is added to the project in the folder that you created.
In addition to importing and deriving models, you can also reverse engineer database scripts to add models to projects.
Reverse Engineering Models
To reverse engineer a model from a database script, follow these steps:
- Right-click the folder in which you want to add the reverse engineered model.
- Click Reverse Engineer.
- Select the type of the model. Available options are Physical, Logical/Physical, and Match Template.
- Select the Target Server database and version.
- Click Next.
- On the Overview tab, browse and select the script file from your storage.
- Enter appropriate values in the fields for the other tabs.
- On the erwin Project tab, select erwin Project to specify the model belongs to a project.
- Enter a name for the model.
- Click OK.
The New Model window appears.
The Reverse Engineering Wizard appears.
The model is added to the project. You can find the reverse engineered model in the folder you selected.
Creating Target Models
In addition to deriving models, you can create target models using the following methods:
- Add new model
- Add new model with Auto Sync
- Open model as target
A target model may or may not inherit the objects and attributes of its source model. You can also enable synchronization of a source model with its target, so that every change made to the source is replicated to its targets.
In this example, we will create a target model, TargetModel1, from SourceModel1.
TargetModel1 will be a denormalized NoSQL replica of the SourceModel1.
To create a target model from SourceModel1, follow these steps:
- Right-click SourceModel1.
- Click Add > New Model.
- Enter the name TargetModel1 for the target model.
- (Optional) Select Auto Sync to enable syncing the source model with the target model.
- Select the required database and version for the target model.
- (Optional) Select Advanced Denormalization and Auto Normalization, if required.
- Click OK.
- If you have selected Advanced Denormalization, the Denormalization wizard appears. You can select the objects such as tables and columns for denormalization and click OK.
The Target Model window appears.
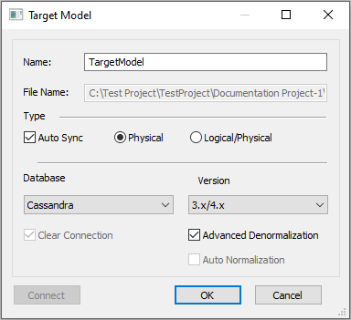
Once you have completed the denormalization process, the new model is added to the project. You can find TargetModel1 under the source model you selected.
Now that you have the project and the models ready, you can start working on the models as required.
At any point of time, you can perform the following actions on the project, using the Project Explorer:
- Rename an object
- Delete an object
- Save the project
- Forward engineer models in the project
- Generate project report
To read more about managing projects, refer to the Managing Projects section.
Managing Projects
You can use the following option in Project Explorer to manage projects.
Renaming Objects
You can change the name of the project or any object in it.
To rename the model, follow these steps:
- Right-click a model.
- Click Rename.
- Enter the new name.
- Press Enter.
The new name is applied to the model.
Deleting Objects
To delete the model, follow these steps:
- Right-click the model.
- Click Delete.
- Click OK to confirm.
Alternatively, select the model and click Delete on the Project Explorer.
The selected model is deleted from the project.
Deleting an object is an irreversible action. You cannot retrieve an object once it is deleted from the project.
While working on the project, ensure that you save your changes at regular intervals and before closing erwin DM to avoid losing the progress.
Saving Project
To save a project, click Save on the Project Explorer. This saves all your progress to the specified project folder.
You can also choose to save the project to erwin Mart. Saving to Mart ensures security of the data and enables team collaboration.
To save a project to Mart, you must first connect to erwin Mart.
Checked-out mart models in projects are always saved to their original library.
Once you are connected, to save the project to Mart, follow these steps:
- In the Project Explorer, click Save to Mart
 .
. - Specify a root path for the project and click OK.
The Mart window appears.
The project and models are now saved to Mart. You can access the project or any model in it any time from your mart.
Now that you have added multiple models into the project, you can forward engineer the models and generate schema scripts.
You can generate schema scripts and alter scripts for the models in the project using the Forward Engineering feature in Project Explorer. In this example, we will forward engineer all the models in the project, generate alter scripts, and save the script files in your local folder.
Forward Engineering Models
To forward engineer models and generate schema and alter scripts, follow these steps:
- To generate a schema script for the models in the project, click Schema Script
 in Project Explorer. Alternatively, you can right-click the project and click Forward Engineer > Schema Script.
 - To filter models from the list, enter appropriate values in the following filters and click Refresh.
- Database
- Model Name
- Parent Filter
- (Optional) To preview the alter script for a model, select the model and click Preview.
- Click OK.
To generate a schema script for the models in the project, click Alter Script in Project Explorer. Alternatively, right-click the project and click Forward Engineer > Alter Script.
For this example, click Alter Script to generate alter scripts for the models.
The Alter Script window appears.
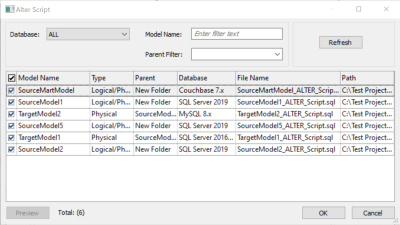
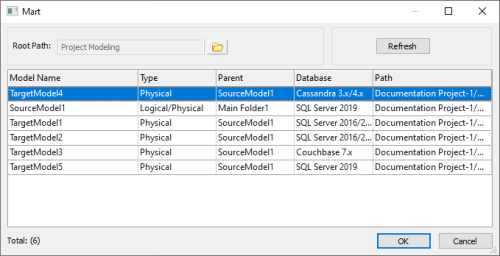
As we are generating alter scripts for all models in the project, select All in the Database drop-down, click Refresh and select all models.
Alter scripts are generated for all the models in your project. You can find the alter scripts in the Forward Engineering folder in your local project folder.
Finally, you can generate reports for all or selected models in the project using the Report option in Project Explorer. The project report contains details like model names, model types, parent models, database types, and model file path in your local or online folder.
Generating Project Reports
In this example, we will generate reports of all SQL Server database models in HTML format.
To generate project reports, follow these steps:
- In the Project Explorer, click Report
 .
. - To filter models from the list, enter appropriate values in the following filters and click Refresh.
- Database
- Model Name
- Parent Filter.
- Click Generate Report and select HTML from the drop-down.
- On the Generate tab, specify a location for the project report.
- (Optional) You can customize the report further using the HTML tab.
- Click OK.
The Report window appears.
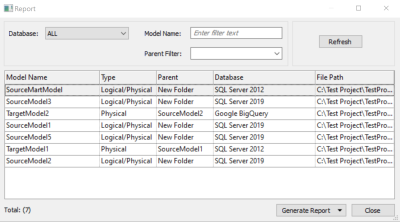
As we are generating reports for all SQL Server database models, select SQL Server in the Database drop-down, click Refresh, and select all available models.
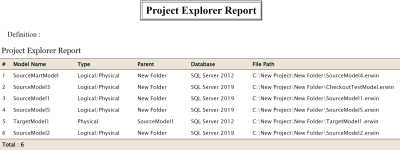
The Generate Report window appears.

Project Report is generated for the selected the models. You can find the report for all SQL Server models in the directory location you specified.
|
Copyright © 2025 Quest Software, Inc. |