You can derive a new target model from an existing source model in a project, using the Project Explorer.
To derive a model, follow these steps:
- Right-click the required source model and click DL_Derive.
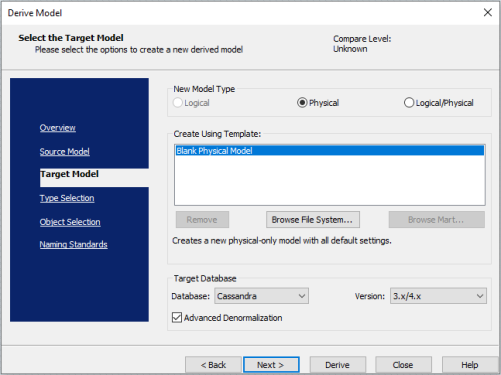
- On the Target Model tab, select appropriate values in the fields. Refer to the following table for field descriptions.
- Click Next.
- Select appropriate values in the fields. Refer to the following table for field descriptions.
- Click Next.
- Select appropriate values in the fields. Refer to the following table for field descriptions.
- Click Next.
- Select appropriate values in the fields. Refer to the following table for field descriptions.
- Click Derive.
The Derive Model wizard appears.

| Field | Description |
|---|---|
| New Model Type | Specifies the type of the target database model. Available options are Physical and Logical/Physical. |
| Database | Specifies the target model database |
| Version | Specifies the target model database version |
|
Advanced Denormalization |
Specifies whether the source objects are merged into the target objects. Available only for NoSQL databases. For more information, refer to the Denormalizing NoSQL Database Models topic. |
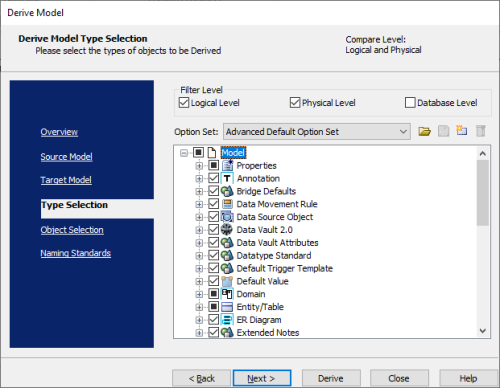
The Type Selection tab opens.

| Field | Description |
Additional Information |
|---|---|---|
| Filter Level | Specifies the set of objects that will be derived to the new model |
Logical Level: Indicates that all objects that are contained on the logical level of a model are selected Physical Level: Indicates that all objects that are contained on the physical level of a model are selected Database Level: Indicates that all objects that are contained on the database level of a model are selected |
| Option Set | Specifies the set of objects and properties to include in the derived model |
Advanced Default Option Set: Indicates that all objects in the selection tree are included, except those objects that are assigned generated values during forward or reverse engineering Speed Option Set: Indicates that the frequently used and required objects are included Standard Default Option Set: Indicates that a default, minimal set of objects and properties are included In addition to the above, the list also displays any custom options sets. |
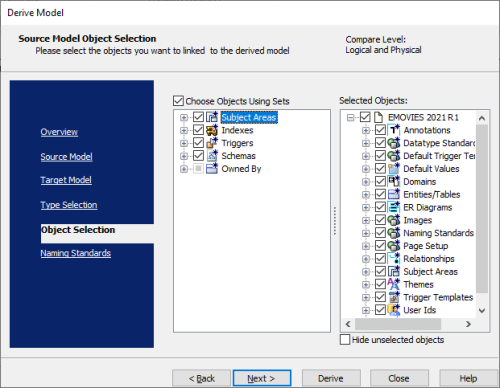
The Object Selection tab opens.

| Field | Description |
|---|---|
| Choose Objects Using Sets | Specifies whether a preset or a custom set of selected options are used |
| Selected Objects | Specifies the selected model objects for the target model |
| Hide Unselected Objects | Specifies whether unselected objects are removed from the list |
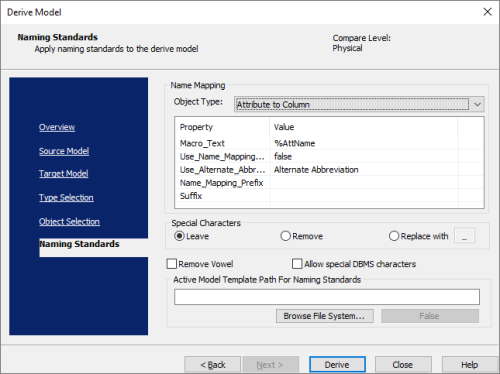
The Naming Standards tab opens.

| Field | Description |
|---|---|
| Object Type | Specifies the object type for which you can set name conversion preferences |
| Property | Specifies the properties of the selected object type |
| Value | Specifies the values of properties of the selected object type |
|
Special Characters |
Specifies how to treat special characters. You can leave them unchanged, remove them, or replace them with a character you indicate. |
|
Remove Vowel |
Specifies that vowels are removed from the object names of the derived model |
|
Allow Special DBMS Characters |
Specifies that special characters are allowed in the target model object names |
|
Active Model Template Path For Naming Standards |
Specifies an existing model template to use to enforce standards in the derived model |
The new model is derived from the source model. After you create a new model using the Derive Model wizard, the model appears in the Project Explorer under the parent model and opens in the Diagram window.
For more information, refer to the Derive a Model topic.
|
Copyright © 2025 Quest Software, Inc. |