(Optional) Select Advanced Options to Refine the Compare Criteria
Use the options in the Complete Compare - Advanced Options Selection pane to select the generic compare criteria. The criteria that you select here apply to all the objects that you have selected so far. The options that you select here determine how you want to compare.
Follow these steps:
- Click the Advanced Options link in the navigation pane and choose the required options from the following options:
- Auto dispose Database/Script Models
Closes the model that is created from the database or script, automatically when you end the compare session. The option to save the model is not displayed.
- Auto resolve missing UDPs
Copies the missing UDPs to the target model, when all the differences are due to missing UDPs. Complete Compare detects missing UDPs or property differences for common UDPs and displays the Type Resolution dialog before the Complete Compare session. Select this check box to skip the Type Resolution dialog when all the differences are due to missing UDPs.
- Case Sensitive Compare
Performs a case-sensitive compare. This option affects both the alignment of objects in the object tree and the equality of property values in the property pane. When the option is cleared, case is ignored for the purposes of alignment and equality testing of text property values.
- Exclude Unaligned Objects in the Left Model
Excludes unaligned model-level objects from the left model in the Resolve Differences dialog. Use this option as a filter to distinguish between changes in a model subset and a larger model of which the subset is a part.
- Exclude Unaligned Objects in the Right Model
Excludes unaligned model-level objects from the right model in the Resolve Differences dialog. Use this option as a filter to distinguish between changes in a model subset and a larger model of which the subset is a part.
You can select both, Exclude Unaligned Objects in the Left Model and Exclude Unaligned Objects in the Right model to compare only the objects that are present in both the models.
- Ignore Code Comments
Excludes blocks of comments from the body of a trigger, before including it in the compare process. If the only difference is in the comments, excluding comments enables Complete Compare to recognize that a trigger has not changed.
- Include Only Generated Objects
Includes objects for which the Generate check box in the property editor is selected. The Generate check box specifies whether you want to generate SQL for the object during forward engineering.
- Prefix Owner
Matches by prefix table owner. When you select this option, objects are aligned based on both the name and owner name property.
- Select Active Subject Area
Specifies that you want to select the active subject area by default in the Object Selection pane. Selecting a subject area by default simplifies the selection, especially in models that contain many subject areas.
- Tablespace in Database
Aligns objects according to both, the IN_TABLESPACE and IN_DATABASE properties, where applicable. This option is available only for the Db2 z/OS database server.
- Using Database Id Matching
Matches by Database ID. This option is available for Informix, SAP ASE, and SQL Server database servers only. If the DB ID property is present, objects are aligned based on the property. Database IDs are present only in models that are reverse-engineered from a database. Select this property to compare a model with the same model that is reverse-engineered from a database.
- Using Name Matching
Matches by object name. Relationship, index, and index members are aligned based on the name, in addition to the normal criteria used to align these objects. Use this property if the models that are being compared have the same named objects with different owners. In this case, you can compare to see if the two models are similar other than the owner or schema name.
- Using Object Id Matching
Aligns objects that are based on the Object ID property, where applicable. This option is available for the Db2 z/OS database server only.
- Click Compare to begin the compare process.
The options are saved and the compare process begins. The compare process is displayed in a progress bar. When the compare process ends, the results are displayed in the Resolve Difference dialog.
The advance options are selected to refine the compare criteria.

Compare and Resolve Differences
Compare the model in the left pane with the model in the right pane. View the differences at the object level, or more detailed property level. To resolve differences, move an object from one pane to the other. When you move objects, open models are updated in real time. After you finish resolving differences, generate ALTER scripts for any or both the models.
The following figure illustrates the model level comparison of Org and Org_New models:
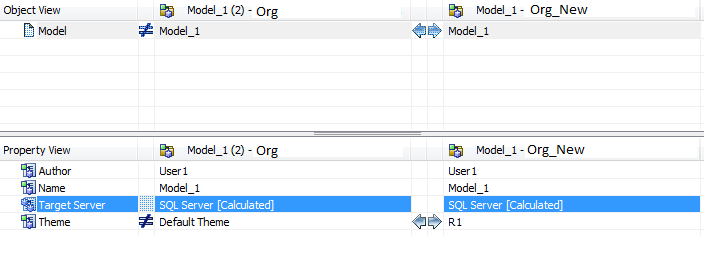
The previous figure indicates that the author, model name, and target database are the same for both, Org and Org_New models. However, Org has the default theme and Org_New has the theme R1.
The following figure illustrates the Entity level comparison of Org and Org_New models:
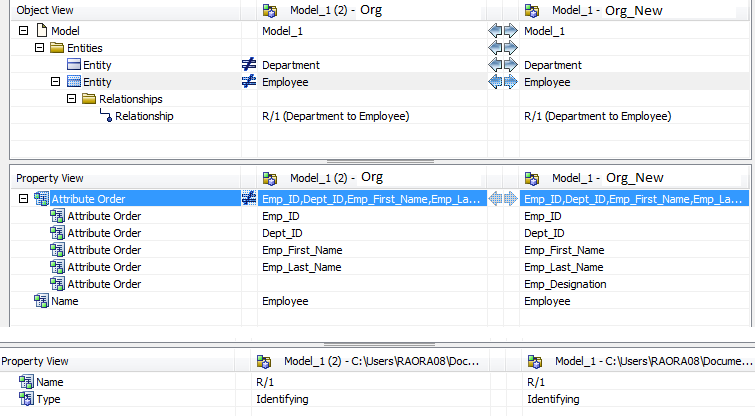
The previous figure indicates that the attribute order does not match. The Org_New model has an additional attribute named Emp_Designation.
To view the comparison details of an attribute, expand an entity and select an attribute. The properties are displayed in the Property View pane.
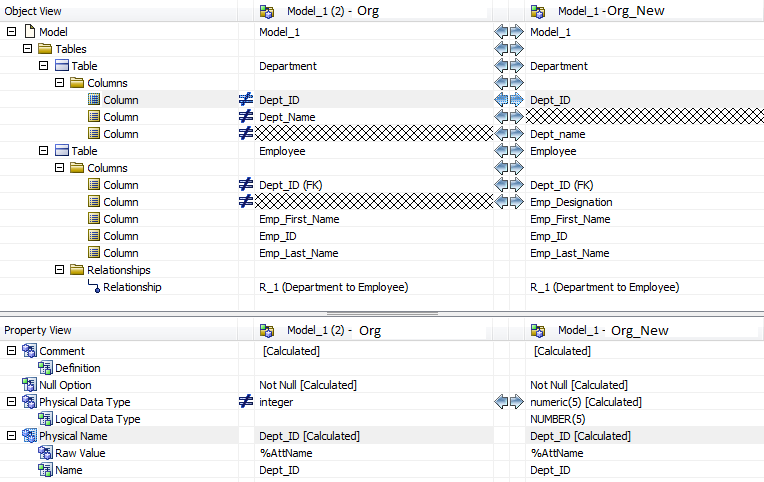
The following figure illustrates the Attribute level comparison of Org and Org_New models:
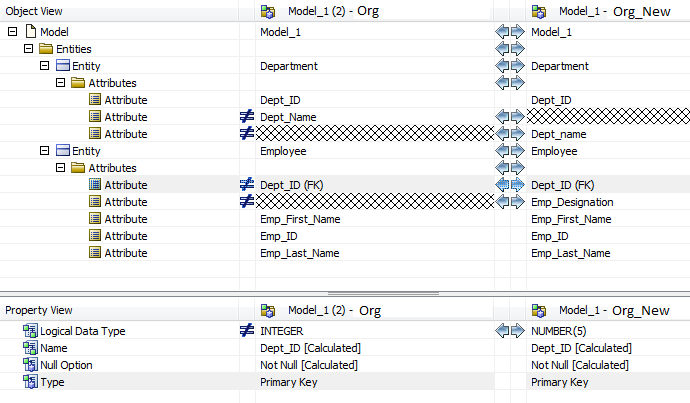
The Property View section in the previous figure indicates that the logical data type for the Dept_ID field does not match.
The following figure illustrates the Table level comparison of Org and Org_New models:
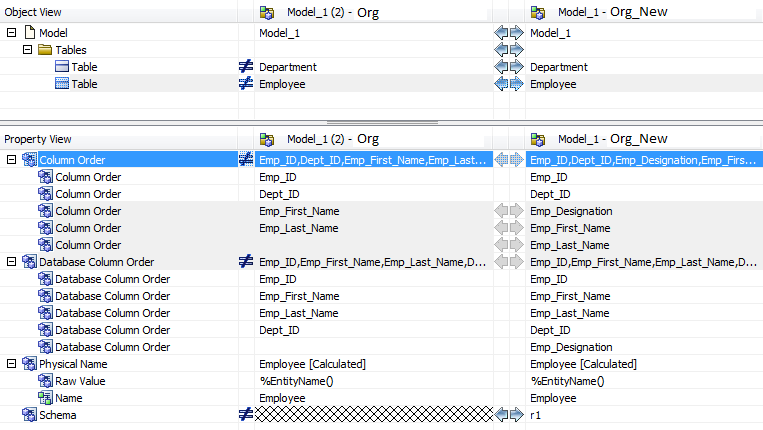
The previous figure indicates that the schemas and the columns are different in the Employee table. In addition, the Column Order and Database Column Order are different in the Org_New model. Column Order indicates the order of columns that appear in the model and Database Column Order indicates the order of creating the columns.
The following figure illustrates the Column level comparison of Org and Org_New models:
Follow these steps:
- Perform the following tasks:
- To view objects and properties that are same in both the models, click the Show Equal items icon.
- To view the property and object rows that resolve into equal rows during your Resolve Differences session, click the Show Resolved Items icon.
When you click this icon, the rows are marked with the change indicator color and the change indicator symbol in the status column.
- To view all the differences between the objects and properties in both models, click the Show Not Equal icon.
This filter is selected by default when the Resolve Differences dialog opens.
- To view the objects that exist only in the left model, click the Show Unaligned Objects on the Right icon.
This filter does not affect property rows. This filter is selected by default when the Resolve Differences dialog opens.
- To view the objects that exist only in the right model, click the Show Unaligned Objects on the Left.
This filter does not affect property rows. This filter is selected by default when the Resolve Differences dialog opens.
- To copy an item that does not match, from the right model to the left model click the Copy item to the Left icon.
- To copy an item that does not match, from the left model to the right model, click the Copy item to the Right icon.
- To match two items, click the Match two items icon.
Use this feature to override automatic matching. You first select an object, click the match icon, then click an object or property with which to match the first object. The items then appear on the same line in the Object View. The toolbar buttons are available or unavailable (dimmed) depending on whether the action is available for the selected item.
- To unmatch items that have been matched, click the Unmatch two items icon.
The items then appear on separate lines in the Object View. The status of the selected item is changed, and the model is updated accordingly.
- (Optional) Generate a comparison report using the following steps:
- In the Resolve Differences dialog, click the Show Report icon.
The Report dialog opens.
- Choose the format in which to display the report and then click OK.
Your report is generated and displayed in the chosen format.
- In the Resolve Differences dialog, click the Show Report icon.
- (Optional) View the explanation for the differences between objects using the following steps:
- Right-click a difference either in the Object View or in the Property View and click Explain to open the Explanation dialog.
- Click the Show Selected Item - Do not track the item check box to display a selected row without tracking the cursor movement.
- Click Finish to implement the changes in the models.
The differences between the wo models are resolved.
- To add an entire object, use the Export or Import icon in the Object View pane. Similarly, to add a property to an object, use the Export or Import icon in the Property View pane. For example, to add a nonkey column to a table, export the column at the Object View. Similarly, to change the datatype of an existing nonkey column, change it at the Property View level.
- The guidelines that govern importing or exporting objects are same as that of creating objects manually in the model. For example, you create a Foreign Key in the model by creating a relationship. Similarly, import or export a Foreign Key, by importing or exporting the relationship. To import or export a relationship, help ensure that both parent and child tables are in the scope of comparison.
- The changes made in the Resolve Differences dialog follow the same guidelines as the changes made in a model. To create a check constraint, you create a Validation Rule in the model, associate the rule with a column, and give it a unique name. Similarly, to import or export a column with a check constraint, import or export the corresponding Validation Rule as well.
|
Copyright © 2025 Quest Software, Inc. |