In Quest Data Intelligence 16.0, the tagging system now uses tag groups to organize tags into meaningful categories with governance controls. Unlike the earlier flat structure, Tag Groups let you organize tags by purpose and control how they're created and used across your organization.
Understanding Tag Groups and Tags Relationship
Before creating tags, understand the relationship between tag groups and tags:
|
Element |
Purpose |
Created By |
|---|---|---|
|
Tag Group |
Organizes related tags and defines governance policies including publishing status, multi-select capabilities, master enforcement, and visibility settings. |
Administrators and Data Stewards |
|
Tag |
Individual tags assigned to assets within a specific tag group |
Administrators, Data Stewards, or Business Users (depending on Master Enforced setting) |
This topic covers two workflows: creating tag groups and adding tags to them.
Creating a Tag Group
Tag Groups are containers that organize related tags and define their behavior. You must create a tag group before adding individual tags to it.
Prerequisites
-
Ensure you user role is Administrator or Data Steward.
-
Clear understanding of your tag group's purpose and visibility requirements.
-
Define a naming convention for tags within the group.
To Create a Tag Group
-
Go to Application Menu > Miscellaneous > Enterprise Tag Groups.
-
Select
 from the Tag Groups pane. The Add Tag Group screen opens.
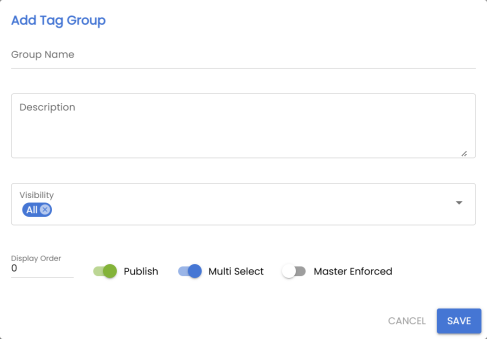
-
In the Add Tag Group screen, enter a descriptive name for your tag group. For example, Data Quality Classification.
-
(Optional) Enter a description that explains the purpose of this tag group.
-
Configure the following settings:
Publish: Switch on the toggle to publish the tag group and make it available to users immediately, or switch off to keep it as a draft.
Multi Select: Switch on the toggle to allow users to assign multiple tags from this group to a single asset, or switch off to allow users to assign only one tag from this group per asset.
Master Enforced: Switch on the toggle to restrict users to select only predefined tags from the tag group list or switch off to enable users to type custom tag names directly into the field and create new tags on-the-fly.
You can also manage these settings later in the Enterprise Tag Groups page.
-
Under Visibility, select the options to specify where this tag group appears for tagging.
Tip: You can select one or more visibility options based on where you want users to apply tags from this group.
-
Select Save to create the tag group.
After creating the tag group, you can add individual tags to it.
Creating Tags Within a Tag Group
After creating a tag group, add individual tags that users can apply to assets. The process for creating tags is consistent across tag groups, but the available configuration options vary depending on the tag group's settings.
To Add a Tag to a Tag Group
-
Go to Application Menu > Miscellaneous > Enterprise Tag Groups.
-
From the Tag Groups pane, select the tag group to which you want to add tags.
-
Select
 from the tag listings pane. The Add Tag screen opens.
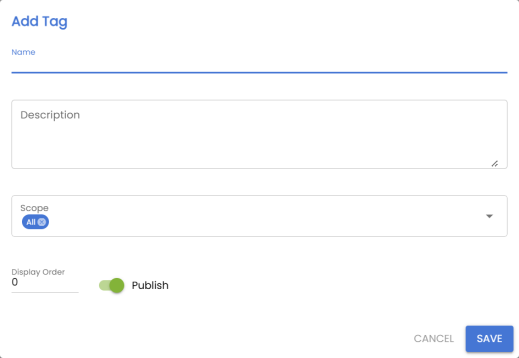
-
Enter the tag name in the provided field. For example, Quality Check and Data Completeness.
-
(Optional) Enter a description that explains the meaning, usage, and context of this tag.
-
Configure the following settings:
Publish: Switch on the toggle to immediately make the tag available for users to apply to assets or switch off to make it available only to the creator and keep it as a draft.
Scope: Select the assets to specify the scope of applying the tag.
-
Select Save to add the tag to the tags listing.
Your tag is ready. Users can now assign it to assets based on visibility settings. For more information on assigning tags to the assets, see Tagging Business Assets.
You can manage an enterprise tag using the options available under the Options column. Managing Enterprise Tags lets you:
- View mind maps
- Edit enterprise tags
- Delete enterprise tags
- View history
Best Practices for Tag Creation
-
Use Consistent Naming Conventions: Apply a standard naming format across your tag group (for example, lowercase with underscores: pii_data, sensitive_content).
-
Keep Tag Count Manageable — Limit the number of tags in each tag group for usability. Too many tags make selection difficult for users.
-
Provide Clear Descriptions — Write descriptions that explain when and why to use each tag.
-
Start in Draft — Create tags in draft status, validate their use, and then publish them.
-
Review Before Publishing — Ensure tag group settings (Master Enforced, Multi-Select) align with your organizational governance requirements before publishing.