Managing Environments involves:
- Editing or deleting environments
- Enable DQ Sync for environments
- Importing metadata from environments
- Exporting metadata from environments
Editing and Deleting Environments
To edit or delete environments, follow these steps:
- On the Explore tab, click an environment tile.
- Click Options.
- Click Environment Options.
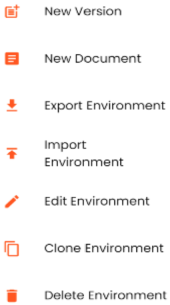
- Use the following options:
- Edit Environment
- Use this option to update the environment details.
- The status of an environment is displayed according to the workflow assigned to the environment. For more information on assigning workflows to environments, refer to the Managing Metadata Manager Workflows section.
- Delete Environment
- Use this option to delete the environment.
The available options appear.

The available options appear.
You can view data quality analysis for environments, tables, and columns when you enable DQ Sync on your environments.
DQ Sync is available for Oracle, Salesforce, Snowflake, MySQL, MSSQL, Hadoop, and PostgreSQL database types.
To enable DQ sync, follow these steps:
- On the Explore tab, click an environment tile.
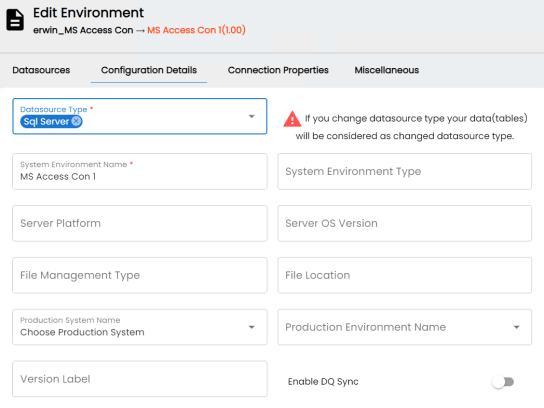
- Click Options > Edit Environment.
- Switch the Enable DQ Sync option On.
This displays the data quality analysis from erwin Data Quality for an environment in the Metadata Manager.Ensure that you configure erwin Data Quality in the erwin DI to view the Enable DQ Sync option. For more information, refer to the Configuring Data Profiling topic.
Once you have enabled DQ Sync for an environment, for data quality analysis results in Metadata Manager, ensure that you do the following:
- Add your environments, tables, and columns as datasets in erwin Data Quality, and run data profiling. For more information, refer to Run Data Profiling topic.
- Then, schedule a job in erwin DI to sync the data quality analysis results from erwin Data Quality.
The Edit Environment page appears.
Once the data from erwin Data Quality is synced, DQ Score for the environment is displayed.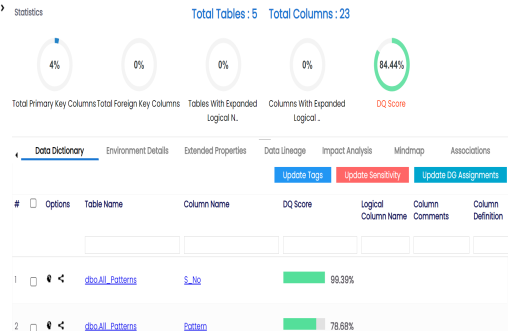
Importing Metadata from an Environment
To import metadata from an environment, follow these steps:
- On the Explore tab, click an environment tile.
- Click Options.
The available options appear. - Click Environment Options.
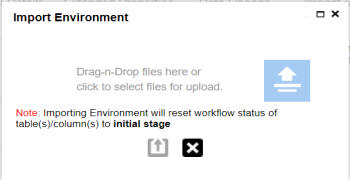
- Click Import Environment.
- Drag and drop or use
 to browse the AMP file.
 - Click
 .
. - Select Schemas and appropriate import metadata options.
- Click
 .
. - Select the tables and click
 .
.

The available options appear.
The Import Environment page appears.
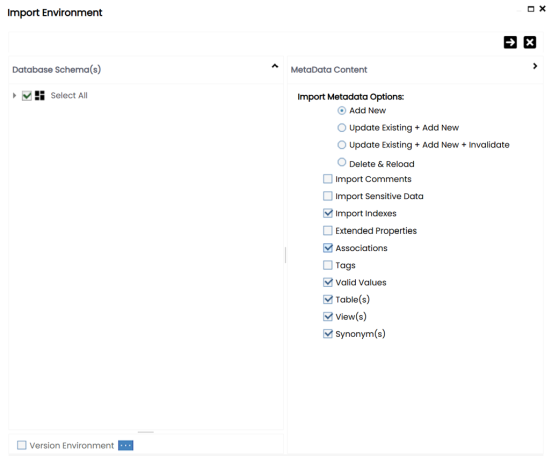
Refer to the following table for the descriptions of the Import Metadata Options.
|
Import Metadata Options |
Description |
|---|---|
|
Add New |
This option adds new objects to the existing object list. The existing metadata is not updated. |
|
Update Existing + Add New |
This option adds new objects to the existing list and updates the existing metadata at the same time. |
|
Update Existing + Add New + Invalidate |
This option adds new objects to the existing list, updates existing ones, and invalidates the table/column during the importing process. |
|
Delete & Reload |
This option deletes all existing metadata and imports only the new objects that have been selected. |
|
Import Comments |
Select the checkbox to import comments. |
|
Import Sensitive Data |
Select the checkbox to import sensitivity classification of the metadata from the data source.
This option is available for SQL, Oracle, and Snowflake environments. |
|
Import Indexes |
Select the checkbox to import indexes of the metadata from the datasource. In addition to the listed datasources, this option is available when the datasource is set to Others.
This option is available for SQL, Oracle, and MySQL environments. |
|
Extended Properties |
Select the checkbox to import extended properties. |
|
Associations |
Select the checkbox to import associated assets. |
|
Tags |
Select the checkbox to import Tags. |
|
Valid Values |
Select the checkbox to import Valid Values. |
|
Table(s) |
Select the checkbox to import Tables. |
|
View(s) |
Select the checkbox to import Views. |
|
Synonym(s) |
Select the checkbox to import Synonyms. |
|
Version Environment |
Select the checkbox to create a version of the environment. |
|
Skip Empty Cells |
Select the checkbox to skip blank cells during import and retain existing metadata values. This option is available only when you select the Update Existing + Add New or Update Existing + Add New + Invalidate option. |
Select the Version Environment checkbox to create a version of the environment.
The environment is imported.
Exporting Metadata from an Environment
To export metadata from an environment, follow these steps:
-
On the Explore tab, click an environment tile.
-
Click Options.
The available options appear. -
Click Environment Options.
The available options appear.
-
Click Export Environment.
-
Switch on or off the Update Options as required.
-
Click Export.
The Export Environment page appears.
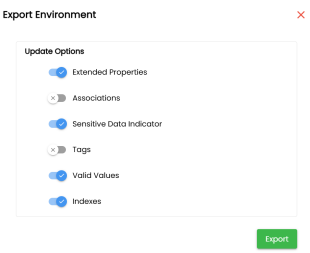
Refer to the following table for descriptions of the update options.
|
Update Options |
Description |
|---|---|
|
Extended Properties |
Switch this option on to include extended properties of the assets. |
|
Associations |
Switch this option on to include associated assets. |
|
Sensitive Data Indicator |
Switch this option on to include sensitive data indicators associated with the asset. |
|
Tags |
Switch this option on to include tags associated with the asset. |
|
Valid Values |
Switch this option on to include valid values associated with the asset. |
|
Indexes |
Switch this option on to include index metadata associated with tables and columns. |
The environment is exported.