You can create your own release object types under the miscellaneous objects in the Release Manager Settings and add those type of release objects to a release in the Release Manager. For more information on adding miscellaneous object types, refer to the Configuring Release Object Types topic.
To add miscellaneous objects to a release, follow these steps:
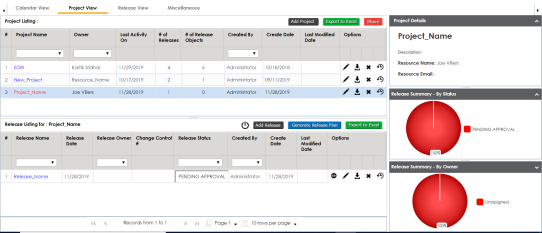
- Under the Project View tab, click the required project.
- Click the required <Release_Name>.
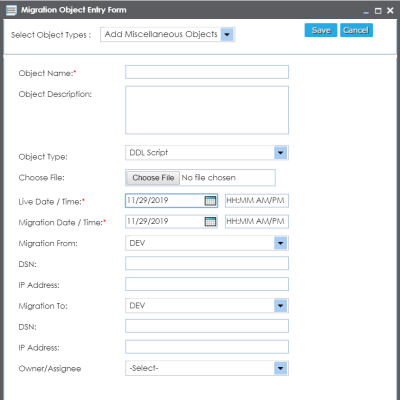
- Click Add Object.
- In Select Object Types, select Add Miscellaneous Objects.
- Enter appropriate values in the fields. Fields marked with a red asterisk are mandatory. Refer to the following table for field descriptions.
- Click Save.
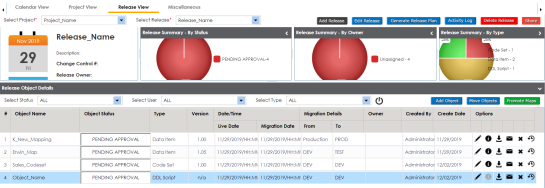
- Use the following options:
- Edit (
 )
)- To edit, the release object, click
.- You can update the release object status only by editing a release object.
- Information (
 )
)- To view the mapping information, click
.Download (
 )
)- To download the release object details, click
.- Email (
 )
)- To send email notification about the release object click
.- Delete (
 )
)- To delete the release object, click
. - Edit (
The release listing of the required project appears.
The Release View page appears.
The Migration Object Entry Form page appears.
|
Field Name |
Description |
|---|---|
|
Object Name |
Specifies the name of the release object being added to the release. For example, AdventureWorks_DDL. |
|
Object Description |
Specifies the description about the release object. For example: The release object is the DDL script of the AdventureWorks environment. |
|
Object Type |
Specifies the release object type. For example, DDL Script. You can add object type in the Release Manager Settings. |
|
Choose File |
Specifies the physical file being attached to the release object. Click Browse to select the file. |
|
Live Date / Time |
Specifies the live date and time of the release object. For example, 04/03/2020 9:30 AM. Live Date is autopopulated and it is same as the release date. Enter the Live Time in HH : MM format. |
|
Migration Date / Time |
Specifies the migration date and time of the release object from a release environment. For example, 04/30/2020 9:30 PM. Use The Migration Date cannot exceed the Live Date. |
|
Migration From |
Specifies the current release environment of the release object. For example, DEV. You can create release environments in the Release Manager Settings. |
|
DSN |
Specifies the DSN name from where the release object is being migrated. For example, ErwinDIS931. |
|
IP Address |
Specifies the IP Address from where the release object is being migrated. For example, 10.32.445.21 |
|
Migration To |
Specifies the release environment to which the release object is being migrated. For example, TEST. You can create release environments in the Release Manager Settings. |
|
DSN |
Specifies the DSN name to which the release object is being migrated. For example, ErwinDIS932. |
|
IP Address |
Specifies the IP address to which the release object is being migrated. For example, 10.31.447.22 |
|
Owner / Assignee |
Specifies the User ID of the release object's owner. For example, jdoe. The option list appears based on the users created in the Resource Manager. For more information on creating users, refer to the Creating Users and Assigning Roles topic. |
The release object is added to the release.
|
Copyright © 2025 Quest Software Inc. |