You can create Snowflake environment by providing the necessary connection parameters.
Before creating a Snowflake environment, ensure that you have the following:
- Prerequisites
- JDBC driver configuration
- TLS connection configuration
- JDBC connection parameters
Prerequisites
To establish a connection, ensure that you have:
- Created a dedicated service account for erwin with Metadata read-only privileges in Snowflake database
- Snowflake Database ports, 443 and 80, available via firewall to accept connections from erwin Data Intelligence (erwin DI) application server
JDBC Driver Configuration
Currently Snowflake JDBC driver is not packaged with erwin DI application. Hence, you can download it here.
Once downloaded, copy the Snowflake drivers to the following location on the erwin DI application server:
\Apache Software Foundation\<Tomcat X.X>\webapps\erwinDISuite\WEB-INF\lib
TLS Connection Configuration
Snowflake JDBC driver version 3.1.x and above implement TLS v1.2 and provide the latest security patches on the protocol. Once configured, the connection uses TLS 1.2 encryption by default.
jdbc:snowflake://<accountname>.snowflakecomputing.com/
?warehouse=DataWarehouseName&db=DatabaseName&schema=
SchemaName&ssl=on
JDBC Connection Parameters
The Connection Properties tab displays the connection parameters to establish connection for Snowflake database connection.
Once the connection parameters are entered, use these options ![]() to go to the next tab, test the connections, save and continue, or save and exit.
to go to the next tab, test the connections, save and continue, or save and exit.
Field Name | Description |
|---|---|
Driver Name | Specifies the JDBC driver name for connecting to the database. For example, com.snowflake.client.jdbc.SnowflakeDriver |
IP Address/Host Name | Enter <accountname>.snowflakecomputing.com For example, analytixds.us-east-3.snowflakecomputing.com |
DBMS Name/DSN | Enter the Snowflake database name. For example, AW2012_DV. |
Port | Specifies the port to connect with the database. 443 is the default port for the Snowflake database. You can change it, if required. |
User Name | Enter the Snowflake (Service account) username. For example, shawn. |
URL | Specifies the full JDBC URL that is used to establish a connection with the database. It is autopopulated based on the other parameters. For example, jdbc:snowflake://<accountname>.snowflakecomputing.com/ ?warehouse=DataWarehouseName&db=DatabaseName& schema=SchemaName |
Password | Enter the Snowflake (Service account) password. This field is available only when Use KeyPair is not selected. |
Save Password | Specifies whether the password is saved |
| DBMS Instance Schema | Specifies the schema of the database. Use this option to select multiple or narrow down to single schema. |
| Use KeyPair | Specifies whether key pair authentication is used to connect. Click |
Connection Pool Type | Specifies the connection pool type being used to connect via JDBC. For example, HIKARICP and BONECP. |
Number of Partitions | Specifies the number of partitions of the database. It is autopopulated with default number of partitions. You can edit and provide the number of partitions as required. For example, 1. |
Minimum Connections Per Partitions | Specifies the minimum connections per partitions of the database. It is autopopulated with default minimum connections per partitions. You can edit and provide the minimum connections per partitions as required. For example, 3. |
Maximum Connections Per Partitions | Specifies the maximum connections per partitions of the database. It is autopopulated with default maximum connections per partitions. You can edit and provide the maximum connections per partitions as required. For example, 5. |
To use database options, click ![]() (Options).
(Options).
The Database Options page appears. It displays the available database options.
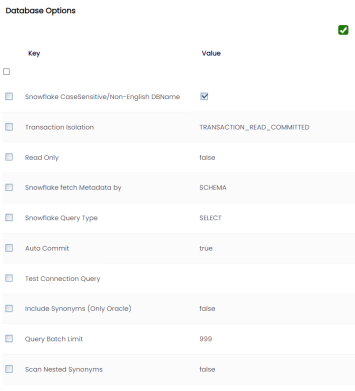
Select keys and double-click the cells under the Value column to set the values of the keys. Click ![]() to save the database options.
to save the database options.
|
Copyright © 2026 Quest Software Inc. |