You can create Oracle environments using the following methods:
You can create Oracle environments and can also enable RAC/Service to:
- Use Oracle cluster database
- Capture Oracle Service name in DSN field
Before creating an Oracle environment, you should take a note of the following:
- Prerequisites
- JDBC driver details
- TLS connection details
- JDBC connection parameters
Prerequisites
Prerequisite steps for establishing successful connection:
- Creation of dedicated service account for erwin with Metadata read-only privileges in Oracle database
- Firewall connection open between Oracle and erwin DI application server
- Oracle Database port opened to accept connections from erwin DI application server
Oracle JDBC driver is out of box packaged with erwin DI application. Hence, no JDBC driver configuration is required from end user standpoint.
TLS Connection Details
- Oracle JDBC 8 driver provides native TLS 1.2 support and upgrading the driver to JDBC 8 will provide the necessary resolution.
- Once the product is upgraded to the oracle JDBC 8 driver, TLS connectivity can be ensured by setting a few system parameters and also adding TLS parameters to the JDBC URL string to support connectivity using TLS 1.2
URL Format: jdbc:oracle:thin:@<Ip Address>:<Port>/< service name>+TLS params
The Connection Properties tab displays the connection parameters to establish connection for SQL Server (SQL authentication) connection.
Once the connection parameters are entered, use these options ![]() to go to the next tab, test the connections, save and continue, or save and exit.
to go to the next tab, test the connections, save and continue, or save and exit.
You can select the RAC/Service check box in the Configuration Details tab to:
- Use Oracle cluster database
- Capture Oracle Service name in DSN field
Enter appropriate values in the fields (connection parameters). The fields marked with a red asterisk are mandatory.
|
Field Name |
Description |
|---|---|
|
Driver Name |
Specifies the JDBC driver name for connecting to the database. For example, oracle.jdbc.driver.OracleDriver |
|
IP Address/Host Name |
Enter the IP address or server host name. For example, 10.32.445.21 |
|
DBMS Name/DSN |
Name of the Oracle Service – SID or TNS Service Name. For example, ErwinDIS931. |
|
Port |
Specifies the port to connect with the database. 1521 is the default port for the Oracle database. User can change it, if required. |
|
User Name |
Enter the Oracle (Service account) user name. For example, erwinuser. |
|
URL |
It is autopopulated based on the other parameters. When using the Oracle Wallet, ensure that you use the URL provided by the Oracle administrator. For more information about Oracle Wallet, refer to Oracle Wallet section. |
|
Password |
Enter the Oracle (Service account) password. For example, goerwin@1. |
|
Save Password |
Specifies whether the password is saved |
|
DBMS Instant Schema |
Specifies the name of the database schema. For example, DBO. Use this option to select multiple or narrow down to single schema. |
|
Connection Pool Type |
Specifies the connection pool type being used to connect via JDBC. For example, HIKARICP and BONECP. Select the appropriate connection pool type. |
|
Number of Partitions |
Specifies the number of partitions of the database. It is autopopulated with default number of partitions. You can edit and provide the number of partitions as required. For example, 2. |
|
Minimum Connections Per Partitions |
Specifies the minimum connections per partitions of the database. It is autopopulated with default minimum connections per partitions. You can edit and provide the minimum connections per partitions as required. For example, 3. |
|
Maximum Connections Per Partitions |
Specifies the maximum connections per partitions of the database. It is autopopulated with default maximum connections per partitions. You can edit and provide the maximum connections per partitions as required. For example, 5. |
To use database options, click ![]() (Options).
(Options).
The Database Options page appears. It displays the available database options.
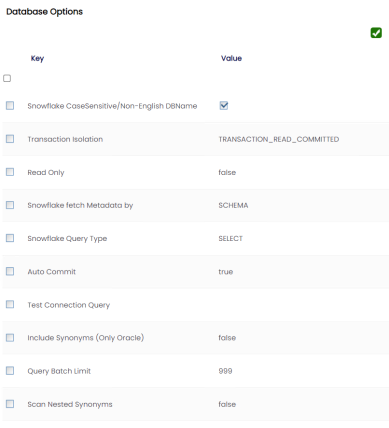
To use the database options, select keys and double-click the cells under the Value column to set the values of the keys. Use ![]() to save the database options.
to save the database options.
The Oracle Wallet allows you to connect to a Oracle database with enhanced security by enabling secure, password-less access.
Before using this method, contact the Oracle administrator for enabling Oracle Wallet for your database and place the wallet files on your machine.
To connect to Oracle databases using the Oracle Wallet, follow these steps:
- Place the Oracle Wallet files on your machine.
The screenshot below displays the files available in Oracle Wallet placed in a location.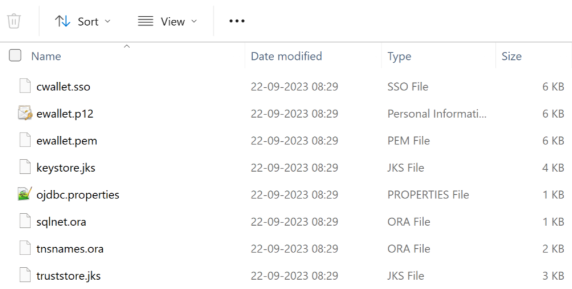
- Enter the database details in the Configuration Details tab.
- On the Connection Properties tab, enter appropriate values in the fields. The fields marked with a red asterisk are mandatory.
Ensure that you use the URL provided by the Oracle administrator in the URL field. For example, jdbc:oracle:thin:@testdb_medium?TNS_ADMIN=D:\OracleWallet.
- Click
 (Options) to view the database options.
 -
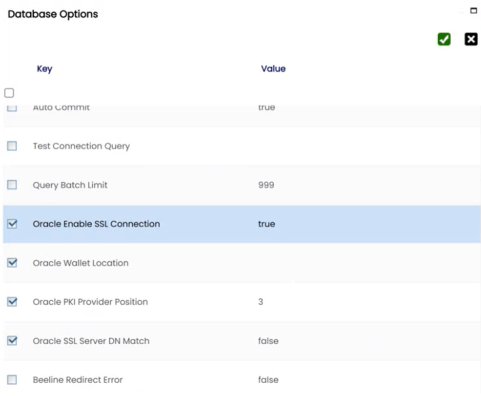
On the Database Options page, select the following options for Oracle Wallet based authentication:
- Oracle Enable SSL Connection
- Oracle Wallet Location
- Oracle PKI Provider Positions
- Oracle SSL Server DN Match
- Oracle Enable SSL Connection
-
Set the Oracle Enable SSL Connection to true.
-
Specify the wallet file path in the Oracle Wallet Location option.
-
Click
 to save the database options.
|
Copyright © 2026 Quest Software Inc. |